Follow my blog

Enter your email address and when a new post is posted, you'll get an email to let you know!

Tuesday, April 30, 2013

Hi Crafters, Stampers and Blog Followers,

Here's my latest project... you have to guess who it's for. 

After having a look on Pinterest I saw that there were heaps of different activities that you can do with bean bags to help children learn. From alphabet to numbers and colours, you could even do shapes.And I thought it'd make a great gift idea for a young child to help learn their name. I think it'd be fun to make the whole alphabet, but that might be an activity for another time! As a teacher I love when students can recognise and spell their name when they come to school and Megan is well on the way to doing that and she's only three!


They are pretty easy to make, but they are a little fiddly. I'm more than happy to make them for you. Check  out Pawmark's Facebook page for more details or email me.

Keep leaving your mark,
Brooke

Wednesday, April 24, 2013

Mailing List Update

Hi there Stampers, Crafters and Blog Followers,

I have a new computer that doesn't crash all the time! It's great. But I did loose a few contacts from my contact list on my email, so I'm updating. A newsletter sent via email, if you don't have email, I'm sure I could print one off and send it via snail mail for you.

If you'd like to be on my mailing list please email me ASAP do I can get your name on my list.

Thanks heaps and keep leaving your mark,
Brooke

brooke@impulse.net.au

Tuesday, April 23, 2013

My Digital Studio

Hi Stampers, crafters and blog followers,
Here is another Stamp in Up deal for you, but this one is free! And we all love free. It's a 30 day free trial of My Digital Studio (MDS).
What is it? Basically, it's scrapbooking on your computer. You can create cards, scrapbook pages, invitations, calendars, so many options!
What are the advantages? Less mess, it's really that simple. And the digital world that will live in, also allows all those with computer knowledge to create some masterpieces.
Cost? I have to admit, I am only trying the free trial myself. It still costs money to buy accessories. You can buy different 'stamp sets' and things. There are some freebies too. So I can't really answer this question for you, sorry.
Where do I go? On the Stampin Up Australia website, if you click on the STORE link up the top, you can purchase anything online! And get it sent directly to you, pretty amazing! But for the free trial, click on My Digital Studio and you'll see the free trial there. Once you create an account and let them know your demonstrator is me - Brooke Ball from Epsom 3551, you can go to the checkout and it's ready to download. It is that easy.
After I had a play, what do I do? You can print your work! And share it with you family and friends.
It would also be great to hear what you think, positive and negative. Just shoot me an email, Facebook or blog comment and you'll go in the draw to win a $5 Pawmark voucher. You can put it to any of my creations or Stampin Up products that you buy through me.
I hope to hear from you.
Keep leaving your mark,
Brooke

Monday, April 22, 2013

Elephant Taggies

Hi Stampers, Crafters and Blog followers,

Not a lot of crafting coming up here on the blog, but that's ok, because for some reason there hasn't been a lot coming out of my craft room either. Feeling a bit sad about it too. Here is something that some of you may have seen on Facebook, but it's important that you hear the full story about this one!

A friend had twin girls recently and I know that there are a lot of people out there that love to dress them the same and give them two matching gifts; but I'm not of that opinion at all. I think that these children are individuals and they deserve to have two very different gifts. So after some browsing on Pinterest (who is it that introduced me to that site again? Because you have a lot to answer to!) I found a really cute little Elephant taggie. I was willing to buy it on the Etsy site, however the seller didn't send to Australia. So me being me, decided that it couldn't be too hard to make one myself... mmmm... well it was a bit harder than I thought, ok a lot harder than I thought. First, I had to draw an elephant and decide how many legs my it was going to have! I know the choices you have to make!

I knew I wanted it to include a bell and some crinkles. And I fell in love with the fabrics in the store, so some decisions were easy!

But this is my final... a girl one and then I was asked to make a boy one. I think they are cute. And the mink fabric (the green/pink) is so soft, horrible to work with, but worth it for its softness!

I'm selling these at $18 each plus postage. If you'd like a name on it, that's no extra cost, it might just take a little longer. Email me to place your order.

Keep leaving your mark,
Brooke

Monday, April 8, 2013

Colour Refresh

Hi there stampers, crafters and blog followers,

Clearly I am getting the hang of this new computer thing. You'll have blog post after blog post. But this is one I have had a lot of emails about... Stampin' Up Colour Refresh.

The colours that are retiring are beginning to retire now, so once they are sold out, they are gone... forever. It's not just the ink pads and ink itself, remember all the accessories, ribbon, paper...

If you'd like to order anything let me know.

Keep leaving your mark,
Brooke

Flower tutorial: customer card

Hey there stampers, crafters and blog followers,

So good to hear such a positive response from my first tutorial. Looks like I may need to do some more.

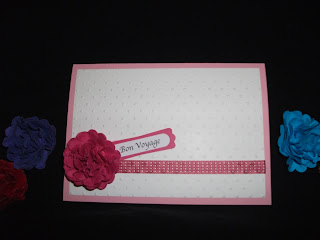
I thought it was lovely that one of my customers sent me picture of her card using the tutorial. Wow! Looks fabulous, don't you think. Great use of the punches too.

Great to see other people leaving their mark,
Brooke

Saturday, April 6, 2013

Simple card with flower tutorial

Hi there Crafters,

This one is for you. One of my customers was after a simple little Bon Voyage card. Well, I don't have any stamps that say that, so this is what I'd do... cheat! lol No really, use your computer, find a font you like, size - remember to make it big enough to read, not just what looks good and of course colour and then print. Now this customer doesn't have the Itty Bitty Banner stamps nor does she have the matching Framelits, but I'm sure you could easily use your scissors, only need to cut an indented triangle on one end because you don't see the other end... you'll understand when you look at the finished card.

Step 1: Get your supplies together (makes card making quicker!)

  • Whisper white cardstock
  • Pretty in Pink cardstock
  • Melon Mambo cardstock
  • Ribbon
  • Embossing folder (I've used the polka dots)
  • Snail
  • Stick strip
  • 1 large brad (you won't see it, so colour doesn't matter!)
  • Scallop Circle punch
  • Big Shot


Step 2: Stamp image


Step 3: Cut image.

I have used the Bitty Banners Framelits. After you've stamped your image, simply place the framelit over the image (as per diagram) and run it through the Big Shot. And there you have your perfect sentiment.


Step 4: Cut, punch, emboss and fold

Fold the A5 Pretty in Pink cardstock in half.
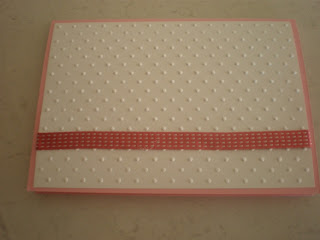
The Whisper White cardstock measures about 10cm x 14.2 and is embossed with the dots embossing folder through the Big Shot. (Don't have a Big Shot, well you can buy these pages already done from me, just another way to help you save some money.)
Punch 6 scallop circles from the Melon Mambo cardstock


Step 5: Stick it together

NOT ALL OF IT! First stick the ribbon to the Whisper White dotty paper. I place some snail adhesive on each end and a little in the middle. Then stick the White dots to the Pretty in Pink card.

 Step 6: Making the flower.

This is the Taa Daa of the card. And yep, you're making it yourself!
STEP A: 
The 6 scallop circles need to be scrunched


STEP B:
Unscrunch and I place them in a shallow bowl of water until they are wet all over, you can tell that the water is absorbed through all the cardstock. Then scrunch them again and unscrunch. Be careful, they are fragile because they are wet.
STEP C:
Punch the center of each circle. DO ALL 6! Don't have a punch? Try a skewer, a  needle , a nail. It's only a little hole to put the brad into.


STEP D:
Thread all 6 damp scallop circles onto the brad and close the brad.

STEP E:
Scrunch (again) over the brad.

STEP F:
Still scrunch... each one individually... you'll get a better look. Make sure they are nice and tight.

STEP G:
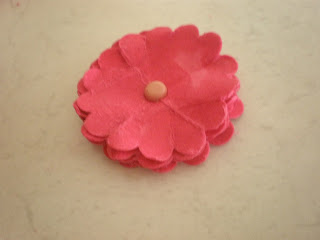
Now carefully play with it til it looks like a flower that you're proud of and let it dry. It won't stick until it's dry!
STEP H:
Place some sticky strip on the back of the flower. Sticky strip is stronger tape and well worth the money. 

Step 7: Finish it off

Now you can stick the flower and your sentiment on. I think I would have preferred the Thank You pointing down, a bit more like a leaf.


Well there's my first tutorial for you. I hope it works for you and if you make a card using the flower, I'd love for you to send me a picture of it so I can post it here for all to see. Would also love to see the colours you choose to use. Please email your pics. Ta.

If you have any problems, I'm more than happy to help you. Just let me know.

I'll be back with a list of retiring colours and new colours very soon.

Keep leaving your mark,
Brooke